Sabtu, 06 Juni 2009

HOW TO play AVI with ps2 hdd

PlayStation 2 (PS2) could be best device to play games but PS2 has broken many limits of its intentional uses thanks to those programmers for providing such programs.

Here is one more way to use PS2 Unethically, Playing .avi (Movies, Video) files on PlayStation (PS2)

SMS (Simple Media System) is program which lets you to play avi files on your PlayStation 2. PS2 doesn’t support avi files nor does it allows you to play Divx or Xvid encoded videos, but SMS (Simple Media System) solves this problem

Basically SMS allows you to play movies you download from the net (Legally i hope) directly onto your TV set without conversion and directly from your Hard Disc. In order to use this guide you need to have modded PS2 (A system that can play Cross regional games)

Steps to Play .avi (Movie Video) files on PlayStation 2 (PS2)

1) Software Required
SMS (Simple Media System), Sony CDVDgen 1.2, IML2ISO Download here
Nero or any Image Burning Software.
The Videos you wish to play.

2) Create One Folder to place everything in that folder

3) Open Notepad and copy below content as it is (Include 2 blank lines simply press Enter Key 2 time) and save it as SYSTEM.CNF

BOOT2 = cdrom0:\BOOT.ELF;1
VER = 1.00
VMODE = PAL/NTSC
Blank Line

Blank Line

4) Start Sony CD DVD-ROM Generator 1.2 (Follow below screenshots)

Make DVD PS2

Make DVD PS2

Enter data in Volume Tab (Could be any thing as its really doesn’t matter) Now Drag following files in exact order

SYSTEM.CNF
BOOT.ELF (rename the file “SMS Version 2.8 (Rev.3).elf” into BOOT.ELF)
Your video files. make sure there is at least 2GB. (these can be any kind of .avi movies)

CD DVD Generator

5) Chose File -> Export as IML file
6) Start iml2iso and open above saved IML file and Press Start Button (It will take some time)

IML2ISO

7) Final Step is to Burn the ISO file on DVD using Nero Like CD/DVD software

See the screenshots below how it will look on PlayStation 2 (PS2)

PlayStation

PlayStation

NOTE: in order for the SMS (Simple Media System) to recognize the external hard disc/flash drive, it must be formatted into FAT system files

Rabu, 03 Juni 2009

How to convert a Playstation 2 save in .PSV format to a different format

This is a common question and to do it you will need the following tools:

Start up PSV Exporter and load the .PSV file you wish to convert.

.PSV file loaded in PSV Exporter.

Now choose the Extract All Files menu item and select a folder to save to.

Choose a folder to save files extracted from the .PSV file to.

Note: You only need to choose a location, the save folder will be automatically generated if not already present

Open up PS2 Save Builder and drag & drop the files extracted from the .PSV folder onto PS2 Save Builder.

PS2 Save Builder open with files added.

In the Root/ID section enter the name of the folder that the files were extracted into using PSV Exporter, like so:

PS2 Save Builder open with files added.

Now all you need do is save in your desired format.

Optional steps to convert to .psu

.psu is the format supported by uLaunchELF, to convert to this format you must select the X-port 2(*.xps) format to save as in the last step.
Open up this new save in PS2 Save Converter and use the Save as menu option to save in the memory Linker (*.psu) format.

Sabtu, 23 Mei 2009

How to Repair a Malfunctioning Playstation 2 - PS2 page 5

Test The Console

Reconnect the power and A/V connectors if they are disconnected. Plug in a controller to the front of the Playstation 2. Put the disc tray cover over the plastic alignment pieces and apply some pressure to the top (not much, just a bit to ensure the disc will seat correctly). It should snap into place and lock the disc in.

Open the tray if it's not already open, and put in a game that's given you problems in the past with DREs or load errors (in my case, Grand Theft Auto: Vice City). Close the Playstation 2 and access the Browser screen to view if the disc was correctly located.


Hey, that sure beats the "Disc Read Error"!

Try out an original Playstation game if you have any and at least one DVD movie. Also try other PS2 games - at least one with a blue underside as well as one that's silver. If you still have problems with one of them, adjust the gear a little more until you find the right angle that works with all of your games and movies. I recommend shutting off the Playstation 2 between each adjustment.

You will probably need to adjust this gear several times to in order to find the perfect spot. Once you find this spot, add a second line to your gear with the marker, but distinguish this line so you'll always have that perfect spot marked. You may need to re-adjust it in a few months or if problems return.

I believe some of the PS2s had two gears instead of one, or a different type of adjustment. These gears do essentially the same thing - try playing around with it and make your PS2 work. If you discover some tips to make your PS2 work that aren't mentioned here

A Couple More Checks / Fixes

While the system is disassembled, be sure to check to see if any wires or connectors are loose. Just tug on them gently and see if they come loose. DO NOT TUG ON THE POWER/EJECT CABLE. Also, if you're having problems with an especially loud open/close mechanism, check the tracks to be sure they're especially clean. The rods that the disc tray slides on are often dirty and can be cleaned with alcohol and a q-tip. Once cleaned, it would be a good idea to lubricate the rods with WD40, cooking oil, or another lubricant, but use a Q-tip when doing so to be sure you do not get the laser dirty. Also lubricate the path that the laser lens moves on - this is essential to longterm functionality.

If none of the fixes outlined here helped your disc read errors, you may need to calibrate the laser using an oscilloscope.

Reassemble the Playstation 2

Once you've thoroughly tested the PS2, reassemble it in the reverse order you disassembled it:
  1. Replace the disc tray cover and tighten its 4 tiny screws.
  2. Reattach the tape to the top of the tray cover.
  3. If it was removed, reinstall the Power/Eject switch by pushing it forward at a 45� angle, over the tab that it locks into. The Power (labled "Reset") part goes toward the top of the cover. Gently push down on the plastic onto the cover. A screw fully secures it later.
  4. Slide the cover on from the front (using the same angle from its removal), being sure it clears the memory and controller slots.
  5. From the bottom, reinsert and tighten the 8 (or 12) screws (the shorter screws go on the shallow side, away from the power connector).
  6. Put the square screw covers back on (the rubber feet go at the corners touching the ground).
  7. Reconnect your A/V and power connectors, controllers, and memory cards.
  8. Play your favorite game!


Sit down with your pet turkey and go kill some hookers!

Conclusion

Hopefully these tips will help you eliminate Disc Read Errors and breathe some new life into your PS2. I've used this process to fix many Playstation 2s in the past so I know it works.

Rabu, 20 Mei 2009

How to Repair a Malfunctioning Playstation 2 - PS2 Page 4

Adjust the Angle of the Disc/Laser

Most Disc Read Errors can be fixed by adjusting the angle between the laser and the disc. This step is essential to the repair but can only be performed on older PS2s.

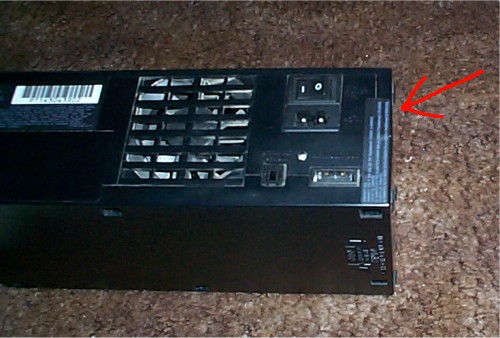
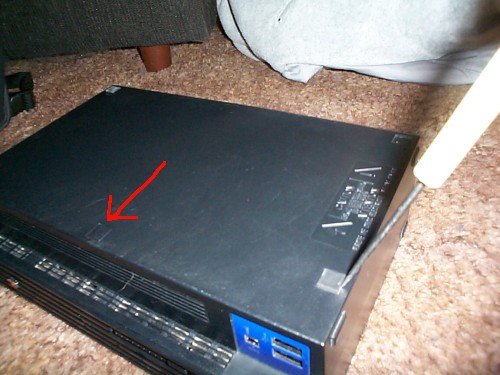
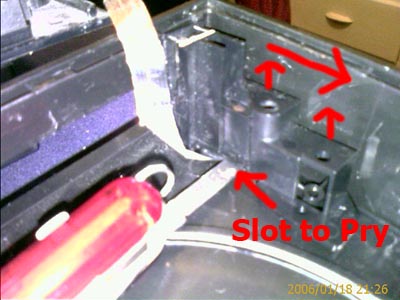
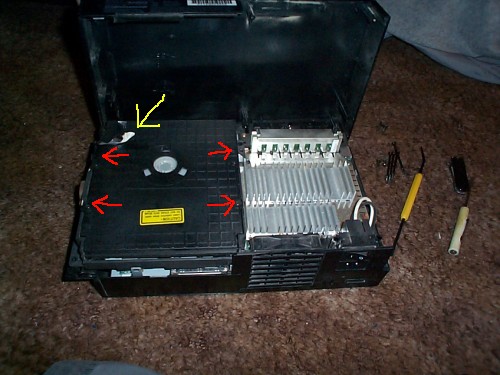
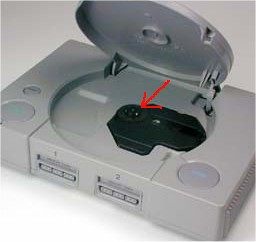
To adjust this angle, we'll use the white gear at the rear of the disc tray. You can barely see it with the disc tray closed, so plug in the Playstation 2's power connector and eject the disc tray. Turn off the Playstation 2 from the rear power switch once it's been opened.

Using a felt-tipped pen or marker, put a line on the gear where it meets the metal notch, so you can always return to this spot if you have problems later.


The plastic gear, found at the rear of the tray, can fix most DREs.

Since the base angle is already recorded, you can now freely spin the gear and observe how the angle of the disc changes to and from about a 10� offset. Set it back to the base point where you marked it. Rotate the disc about 20� or 1/16 of a turn clockwise. You should then test the setting as mentioned before reassembling the console.

Another Method to Fix Disc Read Errors

If your PS2 has a bronze or copper cog next to the white gear, you'll need to follow the other repair process mentioned below and/or disable the motor that rotates this cog, as it will reset the position of the white gear, causing your efforts to have been in vein. I have not verified this technique, but it can apparently be disabled by disconnecting an orange power ribbon on the backside of the DVD disc tray. It may require additional disassembling of the PS2. This cable has no purpose except to reset the position of the gear. Thanks Josh Boston for the tip!

There is a different trick to fix this problem which works on all mdoels, passed onto us by Ari Vuorela, aka Thuuning, a veteran PS2 technician.

Ari explains that the reason for disc read errors is often not the white gear's position, but it's shape and dirt on the lens. He states that as time wears out the unit, the gear tends to bend, creating major problems. Additionally, the lens iself's movement and position may be part of the problem or the lower part of the lens is dirty. Ari's technique for repairing the PS2 is actually quite easy and can be applied if the fix we mentioned above does not work perfectly.

Here's the gist of Ari's e-mail (translated as best we could):
  1. The white plastic gear that moves the laser must make contact with the "motor". A bad contact here can cause disk read errors. Sometimes it looks Ok, but you may need to remove the lens and bend the white gear for good contact.
  2. The two rails on which the lens move must be very slippery - which can be lubricated with cooking or motor oil. Usually the holes where the rail is (on the right side of the lens) are dirty or you have to bore then out slightly, making the holes bigger.
  3. The lens uses little torx screw (black) that move the lens up and down on the rail. Usually the lens is too high and requires adjustment.
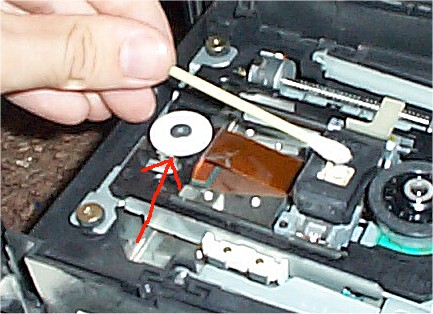
  4. Take the lens off these 2 rails and take the black plastic cover off. Turn the lense upside-down and you'll find there are 2 screws (silver, phillips or torx) that you have to remove to take the upper little lens off.
  5. Then you'll see a larger lens that is usually very dirty (this lens is a mirror to light). If that's dirty, it will give a disk read error. You'll have to take the little electric board off that you see on the other side of the big lens-mirror. It's probably dirty too, so clean it. Alcohol should work OK for this task.
  6. The lens bottom has 2 + 2 screws. You move the upper "little" lens up-down-left-right (this may require a special screwdriver)
  7. The motor "rail" that moves the lens must be very clean and oiled and the 2 rails too.
PS - The secret that makes the PS2 work is that bigger lens under the little lens (the bigger is unknown to most and becomes very dirty).

Usually you don't have to move this white gear at all.

Test The Console

Reconnect the power and A/V connectors if they are disconnected. Plug in a controller to the front of the Playstation 2. Put the disc tray cover over the plastic alignment pieces and apply some pressure to the top (not much, just a bit to ensure the disc will seat correctly). It should snap into place and lock the disc in.

Open the tray if it's not already open, and put in a game that's given you problems in the past with DREs or load errors (in my case, Grand Theft Auto: Vice City). Close the Playstation 2 and access the Browser screen to view if the disc was correctly located.


Hey, that sure beats the "Disc Read Error"!

Try out an original Playstation game if you have any and at least one DVD movie. Also try other PS2 games - at least one with a blue underside as well as one that's silver. If you still have problems with one of them, adjust the gear a little more until you find the right angle that works with all of your games and movies. I recommend shutting off the Playstation 2 between each adjustment.

You will probably need to adjust this gear several times to in order to find the perfect spot. Once you find this spot, add a second line to your gear with the marker, but distinguish this line so you'll always have that perfect spot marked. You may need to re-adjust it in a few months or if problems return.

I believe some of the PS2s had two gears instead of one, or a different type of adjustment. These gears do essentially the same thing - try playing around with it and make your PS2 work. If you discover some tips to make your PS2 work that aren't mentioned here.

Selasa, 19 Mei 2009

How to Repair a Malfunctioning Playstation 2 - PS2 Page 3


Quick Fix

Looking for a quick and dirty fix? Here's one tip that Jason Waite sent in - it could be applied in a matter of seconds as a temporary fix. Since the disc is usually out of adjustment, you simply put four 1" pieces of tape (masking or electric) on the disc as follows to balance it - we haven't tested this technique but Jason assures us it can fix issues. It may be worth a try to some:

Disassemble the Playstation 2

  1. Unplug the power and A/V connector from the back.
  2. Remove all controllers and memory cards.
  3. On the rear of the console, cut along the crack of the warning sticker, or remove it entirely.

  4. This sticker is cool: it says VOID all over it once removed so it cannot be replaced.

  5. Turn the unit upside-down and locate the screw covers. These are tiny (1cm x 1cm) squares. Older models have 8. Newer models have 12: 4 are offset on the ridge area toward the front of the console.

  6. The 30001 has 8 of these; the 4 corner covers are rubber.

  7. Pry these covers out by their corners with a small flathead, knife, or fingernail. Set them aside.
  8. Remove the 8 or 12 phillips-head screws under the feet.
  9. Rotate the top cover upward toward the front of the console. BE CAREFUL! If you meet resistence, check that sticker in the back. DO NOT RIP the cable that leads from the cover to the base. If this cable rips, your PS2 is probably as good as dead.
  10. Remove the tape (yellow arrow in picture below) that holds the cable.
  11. To completely separate the cover from the base, you need to remove the Power/Eject switch from the cover. To do this, put a flathead screwdriver or knife blade between the plastic switch and the cover (there's a tiny slot where you can fit one), then gently pry upward (away from the cover). Once it pops out of place, slide it toward the back of the cover to remove the switch. This is not necessary, but is recommended to be sure you don't ruin this fragile cable.

  12. Pop it upward out of place then slide it back.

  13. Remove the 4 small screws on the disc tray cover (red arrows below) with either a small screwdriver or a knife if you don't have one.
  14. Lift the disc tray cover off and set it aside. Some models may require additional screws to be removed to remove the disc tray cover.
The disassembly process is now complete. Put all those screws somewhere safe and let's continue.

Clean the Inside

Since you're going to clean the laser lens last, it's probably a good idea to clean all the junk out of the case while it's disassembled. You'll probably find some hair if you have pets, lint, fuzz, and lots of dust inside, depending on the console's age.

Using compressed air preferably, clean out the following areas:

  • Cooling fan (at back of the console)
  • Controller and memory card slots
  • Area around the battery, to the right side of the tray if looking at the front (*** If you remove the battery, you must reset all system settings. If your system is not saving such settings, clean the terminals to the battery with alcohol and scrape them clean. If that fails, replace the battery).
  • Under and on all heatsinks
  • Top cover of the console on the inside
  • Under and over the disc tray
Next you should clean the laser lens.

Clean the Laser Lens

Use a clean Q-tip or cotton swab to clean the laser lens. Dip it in rubbing alcohol (the less water/higher alcohol %, the better) and gently dab it onto the lens. Do this a couple times, or even *very* gently move the swab across the lens. Let it dry for a few minutes before you power on the PS2.


You do not need to open the tray to clean the laser

Minggu, 17 Mei 2009

How to Repair a Malfunctioning Playstation 2 - PS2 Page 2


The Playstation Curse Begins

A Little Background: Playstation Woes

This isn't the first time a Sony console has had problems reading discs. My first experience with Playstation problems was years ago, when a well-known software company named Square released what many people consider to be a masterpiece, one of its finest games: Final Fantasy VII. The extremely long and complex game offered incredible graphics, stunning pre-rendered movies, a great soundtrack, and killer storyline.

I clearly remember picking the game up at Software, Etc. in our local mall and rushing home to waste several weeks playing through it. But after playing it for about 10 hours straight, things started to go bad. Videos began to skip, sometimes constantly. It would sometimes take too long to load, if at all. I was very frustrated since my Playstation was nearly new and the game was only hours old. The problems persisted and I eventually was so frustrated I bought another Playstation from a friend, and sold mine "as is" locally. The problem went away with the new unit until I was about 3/4 through the game, then it happened again a few times during videos.

Supposedly the problem with the old Playstations was that the cooling ducts were placed on the bottom side of the unit, offering very little airflow unless it was stood up on a platform of some sort. Newer models fixed the problem by placing the ducts on the sides, where airflow was generally much better. Not many people noticed this problem until the Playstations were slightly older, especially when games were played for many hours on end and videos were played extensively -- exactly what happened with Final Fantasy VII. The game effectively killed many Playstations.

As if these problems were not bad enough, over long times the heat would deform the round black piece that a CD would lock on, causing the disc to drop slightly and create even more read problems. An easy fix was to flip the Playstation over once the disc was in place, which would cure the overheating problem and also put the CD back into its correct position, fixing most video skipping problems. So, problems with Playstations are not anything new, but the fix for the PS2 is a bit more complicated than the original Playstation.

Okay, enough rambling - let's void some warranties.

Tools Checklist

Recommended tools:

  • 2 x phillips screwdrivers: one is about "normal" sized, one is "very small"
  • (a pocketknife or small flathead may be used in place of the smaller phillips)
  • Q-tips or cotton swabs
  • rubbing alcohol or static free cleaner
  • a marker or felt-tipped pen
  • compressed air to clean the inside of the PS2
It might also be a good idea to have an original Playstation game, two Playstation 2 games (one with blue bottom, one with silver bottom), and one DVD movie. These will be used for testing to be sure you've completed the repair correctly.

Be sure you have at least one game to test with so you won't have to disassemble the console again later.

Kamis, 14 Mei 2009

PSP's nub to PS2 Analog Conversion


Thursday, 26 January 2006
This is a great solution to the PSP's nub being so small and having such a bad grip. All you need is an old PS2 controller, and a little bit of patience!

*WARNING** You will end up destroying a PS2 controller.

Updated 2-1-06 with clearer pictures

******

UPDATE: Several people had written complaining about the quality of the original pictures, luckily for all of us shortclix87 came along and took some clearer ones of the process. Thanks shortclix87!

*******


Well, one day I heard about a guy who transferred his PS2 Analog Stick to his PSP. This is a great solution to the PSP's nub being so small and having such a bad grip. Unfortunately, he didn't post a tutorial. So I tried my hand at it and here we go. **WARNING** You need something to grind plastic with.

1. Take a broken PS2 controller or one that you'll never use. You won't be able to turn it back into a regular controller.

2. Take out the small screws in the back of the controller


3. Rip apart everything inside the controller but keep track of the Analog sticks


4. Choose what stick you'll use but keep the other one just in case.


5. Look on the inside of the stick. Where that square hole is, that's where the stick connects to the controller and


6. Now take your grinding tool and grind the outer circular part on the bottom of the stick down as much as you can. Then grind down the little things that stick out diagonally from the square hole. Don't grind the hole though.


7. Now remove your PSP's analog nub. It's easy. Just pull up and it comes right off. No, it doesn't void your warranty. It was made to come off. Look at the bottom of this tutorial later on for a video on how to remove it.


8. Now place on the Analog stick where the nub just was and move it around. If it feels to stiff, take out that grinding tool again and do some more


Now you can easily switch between the nub and stick whenever you want. And you also have a great grip! You've just saved yourself some money!